|
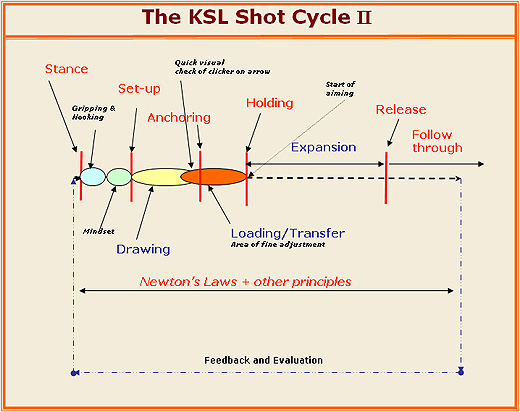
The KSL Shot Cycle
Below is the diagrammatic of the KSL Shot Cycle.
There are many phases of the shot, but basically they can be separated into twelve definable steps, which we will go through below.
Further along we will discuss recommended breathing patterns for developing and experienced archers and superimpose these on the shot cycle for clarity.
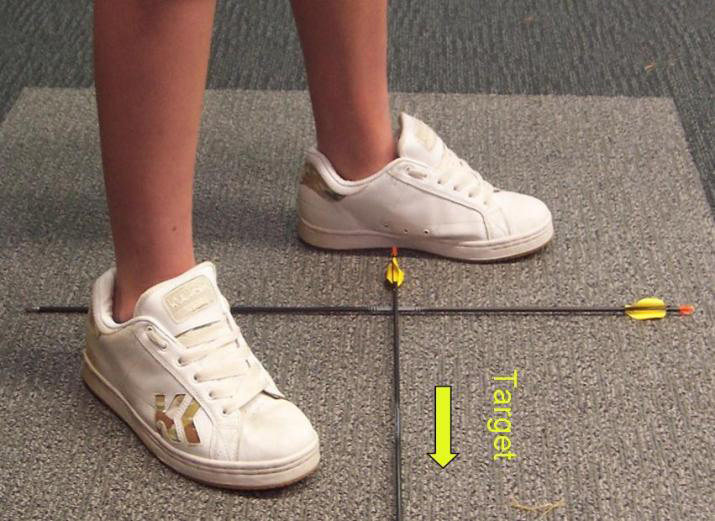
1. The Stance
Success in archery depends on stability and
consistency. The stance is the foundation of the shot and is one of the first
weaknesses I could see of nearly every archer that came to the Australian
Institute of Sport (AIS) and at my coaching clinics; the inability to maintain a
solid connection between top and bottom. Therefore the importance of the stance
and the correct biomechanic structure is paramount as it provides for stability,
strength and endurance.
Firstly let's look at the feet position. The
recommended position is the open stance, click thumbnail under. The open stance
provides for a biomechanically stronger stance, especially in windy conditions.
The feet should be about shoulder width apart with the weight evenly distributed
on both feet.
The recommended weight distribution is about 60-70% on the balls of the feet and
40-30% on the heels. Too many archers stand with more weight on their heels,
which places their center of gravity back over the heels resulting in
instability. Imagine a straight steel rod going through the body with the bottom
of the rod being stuck solidly into the ground and top exiting through the head.
The center of gravity should be positioned approximately between the insteps of
the feet. The hips must be slightly tilted backwards, which can be likened to
the feeling when squeezing the buttocks together. The sternum must be kept down
to provide more front clearance. The shoulders must be inline with the target,
but the hips must stay open to the target.
(Note: Click on any photo on this page to see a larger image.)
2. Nocking the Arrow
Some manuals will devote a whole page to this, however, nock the arrow in the most convenient way to yourself. Usually it is the same way every time, forming part of your shot routine.
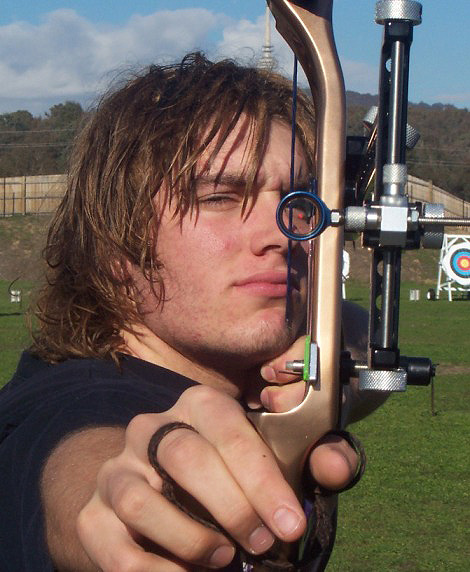
3. Hooking & Gripping
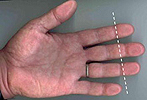
String Fingers
|
Most manuals suggest placing the string behind the first joint of the index, middle and ring fingers, so when the bow is drawn the string will finish up in the first joint of the draw fingers. This, however, over time could cause a harmful corn to develop. Therefore, I recommend that the string be positioned just in front of the index and ring fingers and behind the first joint of the middle finger to prevent this happening; refer to photo. (During my shooting years it happened once to me and the corn kept me out for 6 months)
|
|
When placing the tab on the string the archer must visually check that the position of the tab on the string is always the same for every shot, including the fingers on the tab. To make certain of this exact finger placement on the tab the use of a finger spacer is strongly recommended, as it will allow the fingers in contact with the spacer to be more relaxed. When a finger spacer is not used there will be a tendency to spread the fingers to avoid pinching the nock; this will create unwanted tension in the draw hand. Further the hand must be placed on the string such that the back of the hand is not parallel to the string, but slightly angled away from the string, the way it would finish up under the jaw when at anchor. Shelf tabs are not recommended, as they can prevent a solid connection to be made with the whole upper part of the draw hand.
|

Hooking / Gripping
|
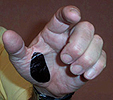
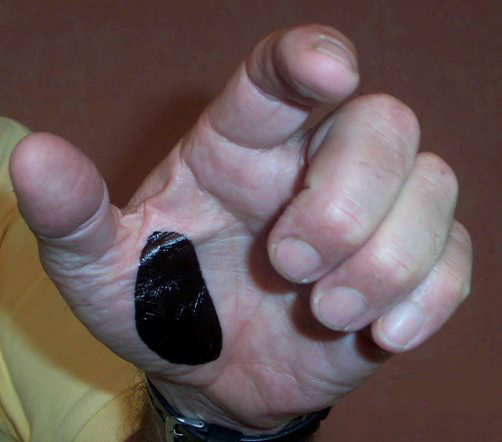
Bow Hand Pressure
|
A small amount of tension is now taken on the string, facilitating the exact placement of the bow hand on the bow handle. The bow hand must be relaxed and placed deep/high into the grip, with the thumb placed such that it will be pointing towards the target once the bow is raised; a little tension in the thumb is acceptable to achieve this. From the beginning of the set-up the bow hand position on the grip must not change. Quite often I will see people "fiddling" to get a comfortable hand position on the grip, which could vary from shot tot shot depending how it feels. Consistent hand placement is extremely important to ensure that the pressure area on the hand is always in the same location on the grip. Refer photo for grip pressure position on the hand.
|
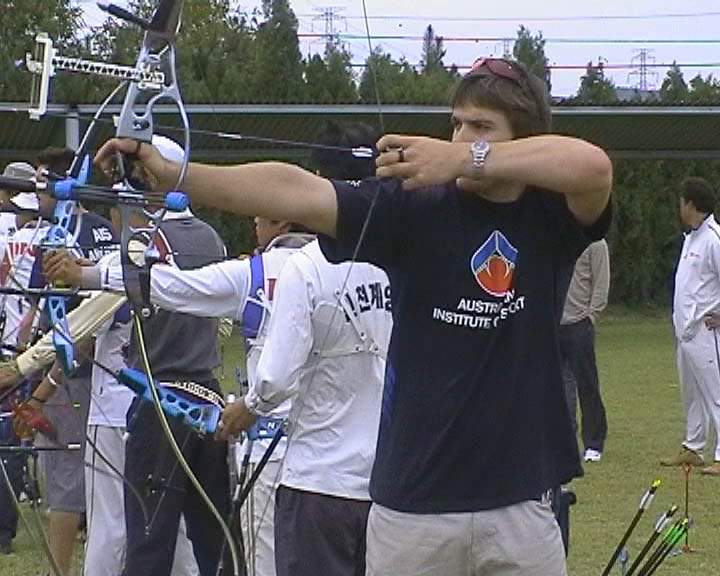
4. Mindset
This is a critical stage of the shot where success or failure is determined. You must have a clear concept as to what you are trying to achieve, determine how much, if any, you have to aim off and eliminate any irrelevant thoughts and distractions caused by events around you. You MUST now become totally process focused and run a quick mental rehearsal as to what the shot should feel like. During this step one or two deep Zen breath should be taken to become fully centered and the body relaxed, especially in the face, neck and shoulder region. It is very important that this mindset step is practiced during training and becomes second nature, as the competition mindset should not be any different. This consistency of thought will create a greater awareness and will promote confidence.
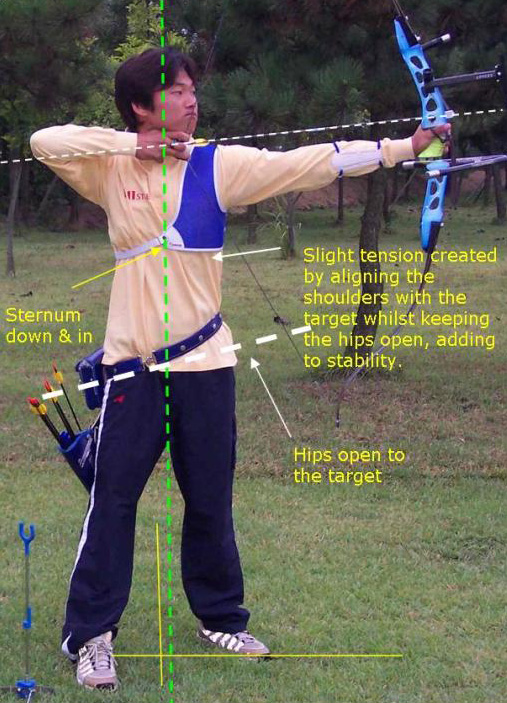
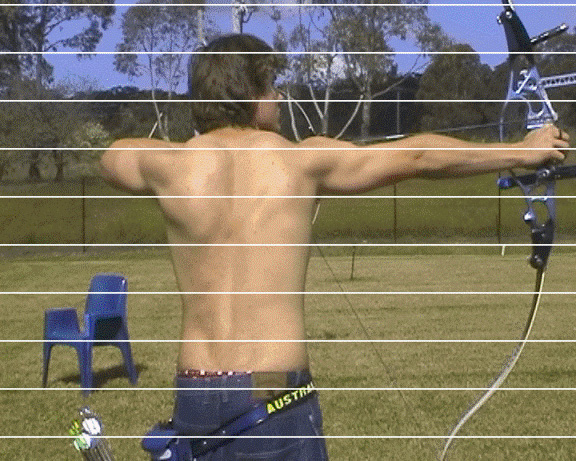
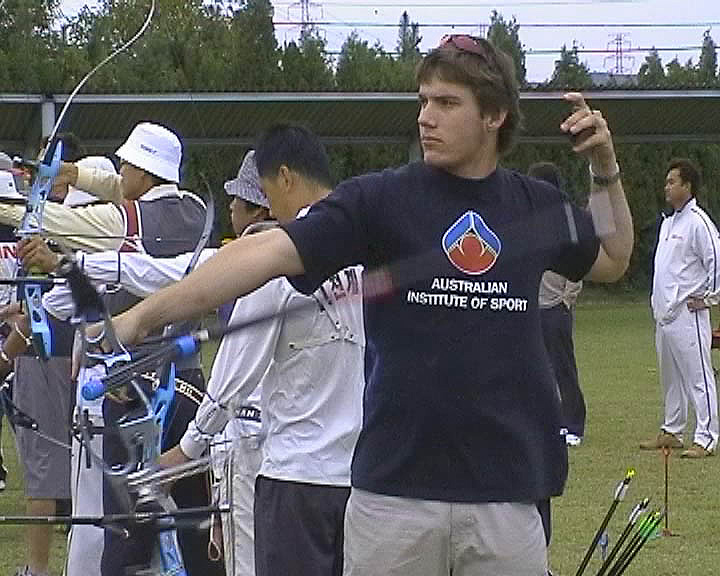
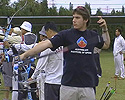
5. Set-up
The next step after the mindset is the set-up. The body should be positioned with about 60/70% on the balls of the feet and 40/30% on the heels. The hips must remain open to the target, whilst the shoulders are brought inline with the target; this will create a little bit of tension just below the ribcage adding to core stability. The sternum should be tucked in and the abdominal muscles tightened. The hips should be rotated forward so it will be possible to squeeze the buttocks a little together. Whilst raising the bow the rear shoulder has to be set back to position the draw side scapula, whilst both shoulders have to remain positioned as low as possible.
The set-up position, see photos below, is achieved not by physically drawing the string back by using the hand and forearm, but by positioning the draw shoulder and scapulae. The photos clearly show what we are trying to achieve. It can be helpful when doing the set-up to visualize the string fingers being connected to the elbow via chains, which will allow for more relaxed drawing fingers, hand and forearm.
When taking up the Set-up position there can be a natural tendency to lean back away from the target to counteract the weight of the bow, which will worsen as the weight increases during the draw. It is therefore advisable to lean slightly forward to the target in the set-up position to counteract this natural tendency.
6. Drawing
The rear scapula has been set back during the set-up - see photo A. The string must be dawn back in a straight line to about 2" - 3" below the chin - see photo B and not directly to the chin. The draw elbow must come around enough to be in-line or as much in-line as possible. This will assist in setting the rear scapula down, maintaining a low rear shoulder and loading the back muscles as much as possible - see photo C.
The Law of Acceleration will apply from the moment the drawing takes place. It is therefore better to draw decisively, rather than drawing slowly and cautiously. This will also get the drawing elbow into line early.
When drawing, the fingers of the draw hand and draw forearm must have a minimum amount of tension. To assist in creating a relaxed draw hand and forearm, visualize the fingers being connected to the elbow by ropes/chains.
From the set-up when starting the draw the bow sight must remain above the horizontal centerline of the target, otherwise, if below, it would require raising the bow arm to come onto the aiming mark, which would create unwanted additional tension in the bow arm. At this stage we must also resist, (refer the end of step 5), the natural tendency to lean away from the target caused by counteracting the weight of the bow, which could easily worsen as the draw weight increases and as such we would lose balance as our Center of Gravity would shift. Also maintain firm triceps in the bow arm to assist in keeping a low draw shoulder. At this stage no aiming must take place yet.
On the breathing side it is recommended to inhale while drawing, as it creates a natural feeling of gaining strength.
We will discuss/explore breathing during the shot cycle as a separate item and in more detail at a later stage.
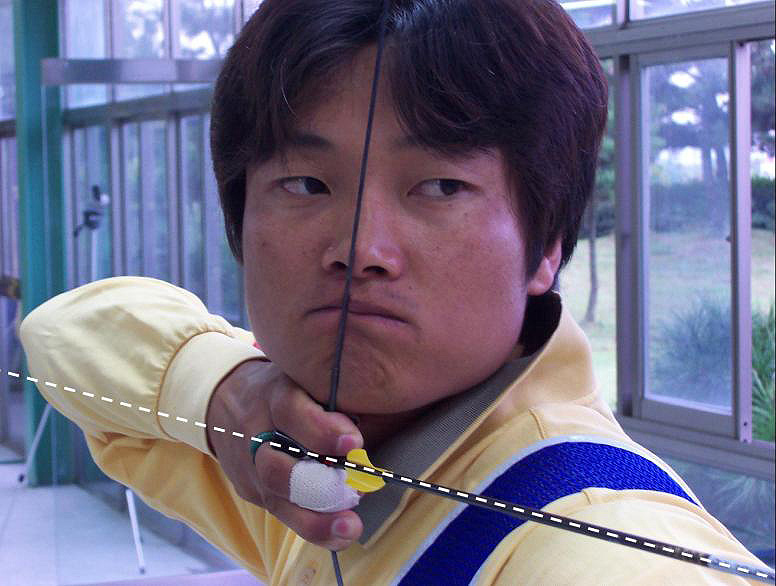
7. Anchoring
Loading

Anchoring
|
Having come to full draw, the whole drawing arm and hand must move up as one unit to the "anchoring" position under the jaw bone. Anchoring is not really the most appropriate word, as it could be interpreted that the draw stops there. A better term perhaps would be to arrive at the "transfer/holding" position. In actual fact the draw changes from an external movement to an internal movement. This maybe a difficult concept to come to grips with, as a continuous draw, meaning not to stop the physical movement of the string, has generally been advocated. Further, this position is determined by the proper positioning of the Scapulae and the drawing elbow. The head is just another reference point in the process, acting as the rear sight.
|
|
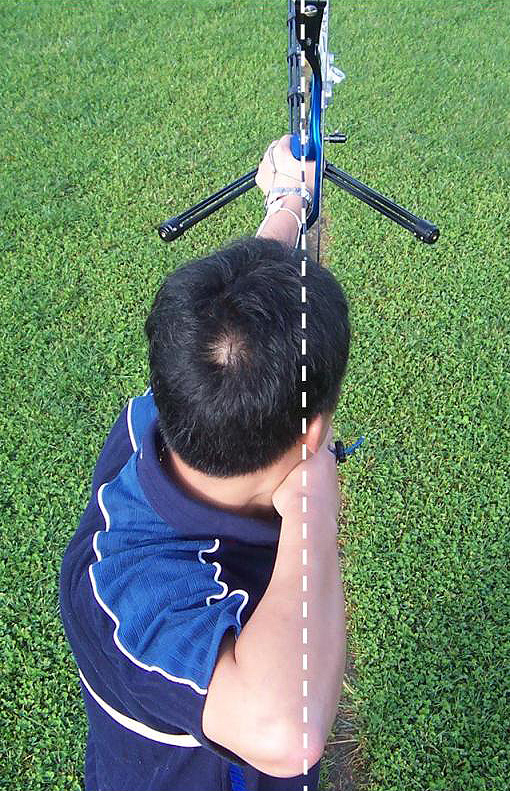
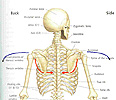
The tip of the elbow, when viewed from the side, should either be in line with the arrow or just a touch higher. If the elbow is too high, the lower trapezius and latissimus back muscles, which are required during the transfer phase, are at the very least difficult if not impossible to activate properly.
|
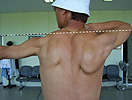
Elbow Height
|

Alignment
|
In addition, when viewing the drawing elbow directly from above, it should be in-line with the arrow. It would be even better to be slightly behind line, but definitely not forward of line. At the commencement of the draw, the draw hand must be set in such a position that it can fit solidly under the jaw bone, without needing to turn the hand during the draw or when coming to anchor to fit on the face. The drawing hand must make solid contact with the jawbone to create a bone-on-bone connection, as this is essential to ensure a consistent "nock-to-eye position". When using a shelf tab the archer must ensure that the top of the draw hand still makes full contact with the jawbone, as quite often only the shelf of the tab touches the jawbone, which could lead to inconsistencies. Any turning of the drawing hand on the face or lifting of the tip of the drawing elbow will change the finger pressure on the string and the dynamics of the shot. The connection between the string and the chin should be firm, as this will make for a strong connection and will support a solid shot.
|
8. Loading/Transfer to Holding
At the beginning of the Loading phase, which commences during the slight overlap towards the end of the Drawing phase, (just prior to anchoring) it is recommended to have a quick visual check of the clicker position on the arrow to achieve greater consistency.
When we draw the string to the anchor point one has to use at least some upper arm, forearm and hand muscles as the string can not be pulled back by just the back muscles alone. Therefore, in order to come to the holding position, some time needs to be taken for the draw load and unwanted tension in the draw hand, upper and forearm and also the bow hand to be transferred onto the lower back muscles. The transfer/loading process should take about half a second. It should be clear that the teaching method of "continuous external movement" is flawed and an obstacle to shooting consistently high scores. As such Holding is crucial and is fundamental for consistence.
Having reached the critical Holding position, the focus must now totally go to and stay on the back muscles. If at this stage, the mind is diverted to anything else, the connection with the core back muscles will be lost. It must be understood that holding is not a step but a critical transition point in a continuous process after all the checks and balances have been carried out. When at Holding, we are ready to commence with the aiming and expansion. Having come to this position, focus must now be placed on rotating the Scapulae down more and towards the spine and squeezing down as we enter the Aiming & Expansion phase.
At this stage we should briefly touch on breathing during the shot, even though this will be a separate subject to be dealt with later,
At the commencement of the draw a deep Zen in-breath is taken, creating a natural feeling of gaining strength. During the transfer/loading process, the breath must be let out slowly in a natural and relaxed manner until the lungs reach about 70% - 50% of their capacity. This exhalation will allow the sight to naturally settle on the gold or aiming mark. The breath must be held during the expansion and till the follow-through is completed.
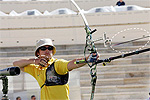
9. Aiming & Expansion
Aiming
|
Up to holding, our mind has been internally focused, but now we must switch to what is called a narrow external focus. The attention must now be directed to aiming. Aiming must only start AFTER transfer/loading phase and once we have reached holding; NOT BEFORE!
The ideal time from holding to release is between one to 3 seconds for best results. The sub-conscious mind must be allowed to place the sight pin in the aiming area and the sight must be allowed to stay fluid and float around. "Aiming" should be approached without anxiety. It should be treated as just another step in the process of shooting an arrow, not the focal point.
|
When we concentrate with some intensity, we can only tune into one thought channel at a time. Consequently, if the focus were completely diverted to aiming, the connection with the core back muscles would be lost. Obviously, some aiming will need to take place, but this should be done more sub-consciously than consciously.
During the expansion phase the draw elbow should ideally go behind line; the draw scapula goes down further and rotates in, towards the spine, opening up the chest in a circular movement. This is basically a micro movement, but due to the Ratio of Movement, this will be sufficient to come the last 1-2mm through the clicker.
We must understand that the expansion is not just a linear movement of push and/or pull, but more a result of a big circular movement, which involves the scapulae to back bone (small movement); the chest bones connecting with the chest joint (bigger movement) and the draw and bow arms (biggest movement). This is the Ratio of Movement (Ratio of Circular Movement or ROCM).
|
To give this feeling of expansion, visualize a connection between the left and right arms. Then by going beyond line and rotating the scapulae towards the spine a feeling of rounding and lengthening of the chest will be experienced, being the greatest between the draw and bow hands, sufficient to get the last few mm through the clicker without push and/or pull. As this movement is both ways, there should be no apparent movement of the string when observed against a reference mark on the chest guard. Usually this can only be observed by technically correct 1350+ FITA shooters. The archer must, during the expansion, maintain firm triceps of the bow arm and A low front shoulder, V-dip, and a relaxed bow hand.
|
ROCM
|
The balance in the shot expansion must always be 50/50. An imbalance of this ratio will affect the center of mass. If there is an imbalance, either the front will go forward or more likely, the dominant drawing side being the strongest, will take over and the archer will lean backwards away from the target.
During this phase, the focus must completely remain on the expansion. Any conscious thought about the fingers on the string or for that matter anything else, must be forgotten or the connection with the core back muscles will be lost, spoiling a smooth release.
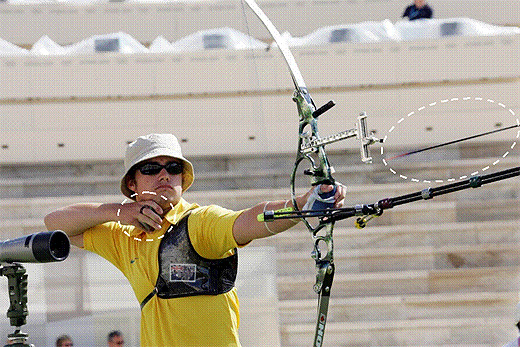
10. Release
Release
|
The string must be released by totally relaxing the drawing fingers and allowing the string to go. The string must be allowed to push the fingers out of the way.
When observing some of the elite archers, their fingers on release and during the follow-through are virtually in the same position as when they were on the string. The photograph shows a copybook release by Tim Cuddihy at the Athens Olympics 2004.
|
The release must be initiated from the core muscles (Trapezius) and must NOT come from pushing the riser with the bow hand or pulling the string with the draw fingers. It is an internal movement as described in step 9.
The activation of the clicker is a phase in the shot that must be sensed or felt, not listened for. This may be a difficult concept to grasp. However, if the archer waits to hear the clicker go off to allow the release, conscious thought goes to the clicker and again the connection with the core muscles will be lost.
Archers who try to release the string by consciously opening their fingers have allowed their focus to go from their back muscles to the fingers. By consciously focusing on the fingers to let go of the string, they stop the continuous motion. This will result in loss of back tension. It will also creates tension in the digitorum muscles, located in the forearm, which control the opening and closing of the fingers.
There is also a separate muscle which controls the little finger called the 'extensor digiti minimi' muscle. The little finger of the draw hand must be relaxed and always be in the same position from shot to shot. Any change in position or tension in this little finger, will affect the level of tension in the actual drawing fingers.
11. The Follow-Through
Follow Through
|
The follow through is really part of the release and is not a separate movement. Correct back tension needs to be controlled for one to two seconds after the release. The continued rotating/squeezing of the Scapulae throughout the follow-through will create a much better feeling of back tension. The follow-through must be a natural reaction and rather than a short release it is recommended to have a long and flowing release, which must not be forced, but must be as a result of having used correct back tension.
|
A forced exaggerated follow-through is an indication of a faulty release. In most cases, it is the result of a forced action that results in changes to the center of gravity, affecting the shot. Additionally, with a forced follow through, the pressure of the different fingers on the string will vary, thus affecting the way the fingers come off the string and leading to inconsistent results.
If the follow-through is natural, the drawing hand, which should be very relaxed, will move backwards and stay in touch with the face following the jaw line for as long as possible. The elbow should go laterally behind with a natural resulting downward movement. The drawing hand must not drop down to the shoulder as part of the follow through, as that will cause the elbow to drop too far down. Additionally, the bow should be visualized moving in a straight line towards the target, although the bow arm will, due to the rotational expansion, move slightly to the left (RH archer).
12. Relaxation and Feedback

Relaxation / Feedback
|
At the conclusion of the follow-through, the body and mind need to get ready for the next shot. Any physical or mental tension created during the previous shot needs to be dissolved. To achieve this couple of deep Zen breaths are recommended. This is also the time for unemotional analytical feedback. Obviously, this is easier said than done, especially after a less than perfect shot. However, as results on the target are absolute, there is only benefit in analytical analysis. It is very important that the archer learns to "feel" the shot, so that any technical discrepancies in the shot can be recognized and corrective action can be taken in subsequent shots. Only the actual location of the arrow on the target should be of interest, as it provides feedback on the process and other assumptions made, including weather conditions.
|
It is very important for the continued learning process and the development of an archer that the archer accepts full responsibility for the outcome of the shot; there are no excuses only reasons for which the archer has to take responsibility. Common excuses such as the wind; distractions such as, the mobile phone that unexpectedly goes off, the TV cameras moving in for a close-up, the noise of the spectators, crying babies, etc., etc., etc. will need to be addressed in the future, if they are found to be an issue for the archer.
This concludes the twelve step KSL Shot Cycle Technique as taught currently by Coach Lee at the USA Olympic Archery Training Center in Chula Vista and previously at the Australian Institute of Sport in Canberra. These twelve steps are fully endorsed by Coach Lee, as is any other technical information, including FAQ, on this website.
KSL International Archery recognizes the importance of uniform coaching and it is rewarding to see that one of the leading nations in archery has whole heartedly adopted the B.E.S.T. (Biomechanically Efficient Shooting Technique) based on Coach Lee's teachings. We wish to share this information freely with those archers and coaches who are willing to open their minds and desire to increase their knowledge by sharing the knowledge and teaching methods of, as was stated by Jim Easton, "one of the most experienced and talented archery coaches in the world and throughout Olympic history".
Note: No part of this document or for that matter any other information on this website maybe reproduced or transmitted in part or in whole by any means for any form of gain or profit without the prior and express consent of KSL International Archery.
|